Freedom Physics Help/Documentation
To Comment,Discuss or ask questions about this, go here: Freedom Physics Discord In a nutshell, Freedom Physics is a 2D physics engine with emphasis on easy to use Level editor where you can easily build/create your own levels and scenarios. Create your own conditions for victory or failure. Engineer complex objects to control and use in levels. Upload/share your content or download and play with other user submitted levels! Game Basics: Starting / Playing | User Modes | Troubleshooting | Keyboard shortcuts Creating Levels: Basics | Options.txt | Tool Menu | Events Menu Uploading/Sharing Levels: Register/Login | Uploading Levels | Downloading Levels |
Playing the game | Go back to Top |
Freedom Physics is not like the usual game where you have a target/goal from the outset. It's More like a sandbox, and what you do with it, is up to you or the person who created the level/content.
The main idea of how to "Play the Game" in Freedom Physics is actually to create your own content/levels/scenarios etc.
Yet of course you can still play with the pre included content/levels. Even use them as starting points for your own levels, copy, edit and save them. What the goal of each level (if any) is will vary from level to level.
There is also a deticated page/site for uploading/viewing/downloaded other levels & content created by other users!
The different User Modes | Go back to Top |
Rocket Mode / Object Scroll Mode
In Game, to enter this user mode - Press 1
This is usually the default mode you start in when you start a level.
The main purpose of this mode is to have the screen follow/scroll with a defined object and hide mouse pointer and menu buttons.
You can use the Events Menu option called "Set Control Obj" to change what object the screen will scroll/follow while in this mode.
Level Editor Mode / Object Creation Mode
In Game, to enter this user mode - Press 2
This is the mode where you use the mouse to click and spawn/create objects into the level world
Using Keyboard shortcuts and or the Tool Menu. You can start building static level terrain or dynamic objects/characters.
Spawning an item with Right mouse click rather than Left is a quick way to spawn an object in static mode where it will not move yet it can still be collided into.
Hand Tool mode / Edit Mode
In Game, to enter this user mode - Press 3
This is the mode where you use the mouse to click and drag / move around objects that are already placed in the world
You can also right click on any object to open an Edit Menu to show that objects ID as well as edit most of the same options/values found in the Tool Menu
Also, using the Hand tool the screen scrolls with the mouse BUT will change to scroll to the last object grabbed/selected with the hand tool aswell until you click again to deselect it.
The reason for this is so you can quickly set an object to scroll with the screen for testing and be able to grab and throw an object and be able to watch it going flying and hit w/e etc.
Troubleshooting Issues with the game | Go back to Top |
This is built for 64 bit only
If you get missing DLL errors download and install latest visual C++ redistributables from microsoft site
Try reporting your other issue in the appropriate thread on Discord Here
Keyboard shortcuts | Go back to Top |
TAB key toggles through level editor, rocket and mouse joint modes
1 key change to Rocket mode
2 key change to Level edit mode
3 key change to Hand Tool mode
left right arrows toggle through objections while in level editor mode
up and down arrow keys toggle through rotation
plus & minus keys on number pad:
while in rocket mode -> increase or shorten grappling hook rope size
while in hand mode -> increase or shorten grappling hook rope size of the last selected object IF they have a rope joint
enter on number pad:
while in rocket mode -> set rope size to max
while in hand mode -> set rope size to max of the last selected object IF they have a rope joint
enter key hides or shows the tool menu while in level editor value
W A S D keys to control the rocket ship
SPACE to shoot rocket ship cannon
E key to shoot rocket grapple hook
Q to release grapple hook
R key to toggle invisible object placement
while in level edit mode press / key to select last used object
pause/break key to stop/continue physics engine movement
while in hand mode, right click an object to open edit window for that object
WHILE USING THE EVENT MENU
The "Trigger Obj ID" is usually the ID of an object but in the case of keyboard events like
keydown / keyup events, it represents the ID of a keyboard key.
To choose what key will be the trigger, after clicking on the "Trigger Obj ID" input box
hold down LEFT Shift, then press a key. You will see the keys ID value be populated into the text box once you press it.
Downloading / Sharing my Levels | Go back to Top |
To download you only need to find the Download Code from the Level Packs page and enter that into the Freedom Physics Application on the main menu. Click the button near the bottom left of the screen that says "Download", then enter the desired download code and Click Download!
You do not need to register or login to just download other peoples Level Packs. But you do need to if you want to rate them.
To Upload / Share your Level Packs You will need to register or login.
Once Logged in you can upload/manage your submited level packs from Here
Creating Levels - Basics | Go back to Top |
The bare minimum needed to make a level is to simple create a directory/folder in the levels folder. If your not sure where the Level Directory is you can simply press the "Open Level Directory" button at the bottom in game.
With nothing but an empty folder the level size will default to your screens resolution size. And there will be no music, just a white background and all other settings/options will go to the default values.
Put a picture called "bg.png" in the level folder and that will be your background image. The size of this image will determine the size of the level.
Put a music file called "music.wav" in the level folder and that music will play while playing the level.
Type a 7 line message into a txt file called "message.txt" and this messsage will display on game start. Use it to give instructions / info on the level.
Put a file called "options.txt" to define some options/settings about the level. see the section called Creating Levels - options.txt for info on what options there are.
When you create objects / events in game and hit "save", this will create 2 more files in this directory: objects.bin and events.bin
You can also create an /img/ directory in your level directory and use it to overwrite the object textures that the base game uses.
So you can have different textures different levels, textures more in line with a levels theme or background
Creating Levels - options.txt | Go back to Top |
This below table will give an example and explain what the option & value do for every possible option available.
These options/values must be placed in a file called "options.txt" and just placed in the level folder.
You must type only 1 keyword and value per line, separated by a single space.
These keywords ARE case sensitive.
| Keyword | Value | Explination |
| gravity | 9.8 | this sets gravity y accel value to 9.8 which is the default |
| nofloor | 1 | this spesifies that there should not be a floor on this level. objects that fall below the level floor will be auto deleted. |
| usermode | 2 | this means the once the level starts user mode 2 will be used, which is hand tool mode. usermode 0 is "controlling rocket ship", 1 is "level editor mode", 2 is hand tool mode |
| disableusermode | 2 | diable the usermodes "hand tool" be sure to leave at least 1 mode enabled or odd things could happen |
| disableusermode | 1 | diable the usermodes "level editor" be sure to leave at least 1 mode enabled or odd things could happen |
| selectedobj | 24 | this will start the game with a selected object (object with ID of 24), if usermode is also 1 or 2 this will result in the background auto scrolling to this object on level start |
| rocketDurability | 95 | set from 0 to 100, 100 means invulnerable rocket. 0 means the weakest, easiest to destroy |
| rocketCollisionChannel | 100 | set the collision channel of rockets to 100 |
| rocketx rockety |
100 200 |
this above 2 lines will set the rockets position on game start to 100,200 |
| rocket2x rocket2y |
200 200 |
this above 2 lines will set the rocket#2 position on game start to 200,200 |
| numberofrockets | 2 | set from 0 to 2 set to 0 if you don't want red rocket to spawn. set to 2 if you want multiple for multiplayer etc. |
| rocketcontrolmode | 1 | sets the control mode to controller#1 for rocket#1 set to 0 to be controlled by keyboard set to 1 to be controlled by controller#1 set to 2 to be controlled by controller#2 |
| rocket2controlmode | 2 | sets the control mode for rocket#2 set to 0 to be controlled by keyboard set to 1 to be controlled by controller#1 set to 2 to be controlled by controller#2 |
| bgImgX bgImgY |
2 1 |
these 2 lines spesifiy how many background images you have. the game can support background images only just over 8000 pixels wide or high for mose computers. so to create larger or longer levels you need to use multiple backgrounds, you must also name your background images bg11.png bg21.png |
| repeatingBG | 1 | this allow you to have large levels by repeating the 1 background it will repeat it horizontally as many times as you have set bgImgX in options.txt it will repeat it vertically as many times as you have set bgImgY in options.txt you will need only provide 1 background image set as bg11.png this is the preferible method when creating large levels because loading many large DIFFERENT background images can use up a lot of memory there is no limit to how many times you can repeat it so you have freedom to make rediculously large levels. |
| disablesaving | 1 | this will disable the ability to save/save exit/ delete level |
| AirFriction | 0.25 | Objects always have a bit of drag even just moving in air. Usefull in top down type levels. |
| floorfriction | 1.00 | this will set the floors friction to max, 0.00 will make it the sliperyiest |
| floorbouncy | 1.00 | this will set the floors bouncy level to max, 0.00 will make it hardest |
| WINDOW_USE_EXTRA | 1 | this will enable open up the 2ndary view screen on your 2nd display if you have one |
| CONTROLLER_MAP | 1 | by default controller#1 will be mapped to emulate some common keyboard presses like arrow keys space, z,x,c,v etc. This option Disable that so that you can program the controller to do something else without triggering these keyboard presses. set to 0 to disable any mapping, set to 1 to have controller#1 mapped to common keyboard presses, set to 2 to have controller#2 mapped to common keyboard presses |
Creating Levels - Tool Menu | Go back to Top |
The Tool Menu is your main friend while you are in level editor mode. Press 2 on your keyboard while in game to be in this mode.
You can open the Tool menu by either clicking the "Tools" Button on the top right of the screen while in Level editor mode or by simply pressing the "Enter" key.
All the options & values in the Tool Menu are what will be applied to the next object you create/spawn while in Level Editor mode.
A preview of the Object will be attached to your mouse pointer so you know what/where your about to spawn the object.
This below picture is the in game Tool Menu:
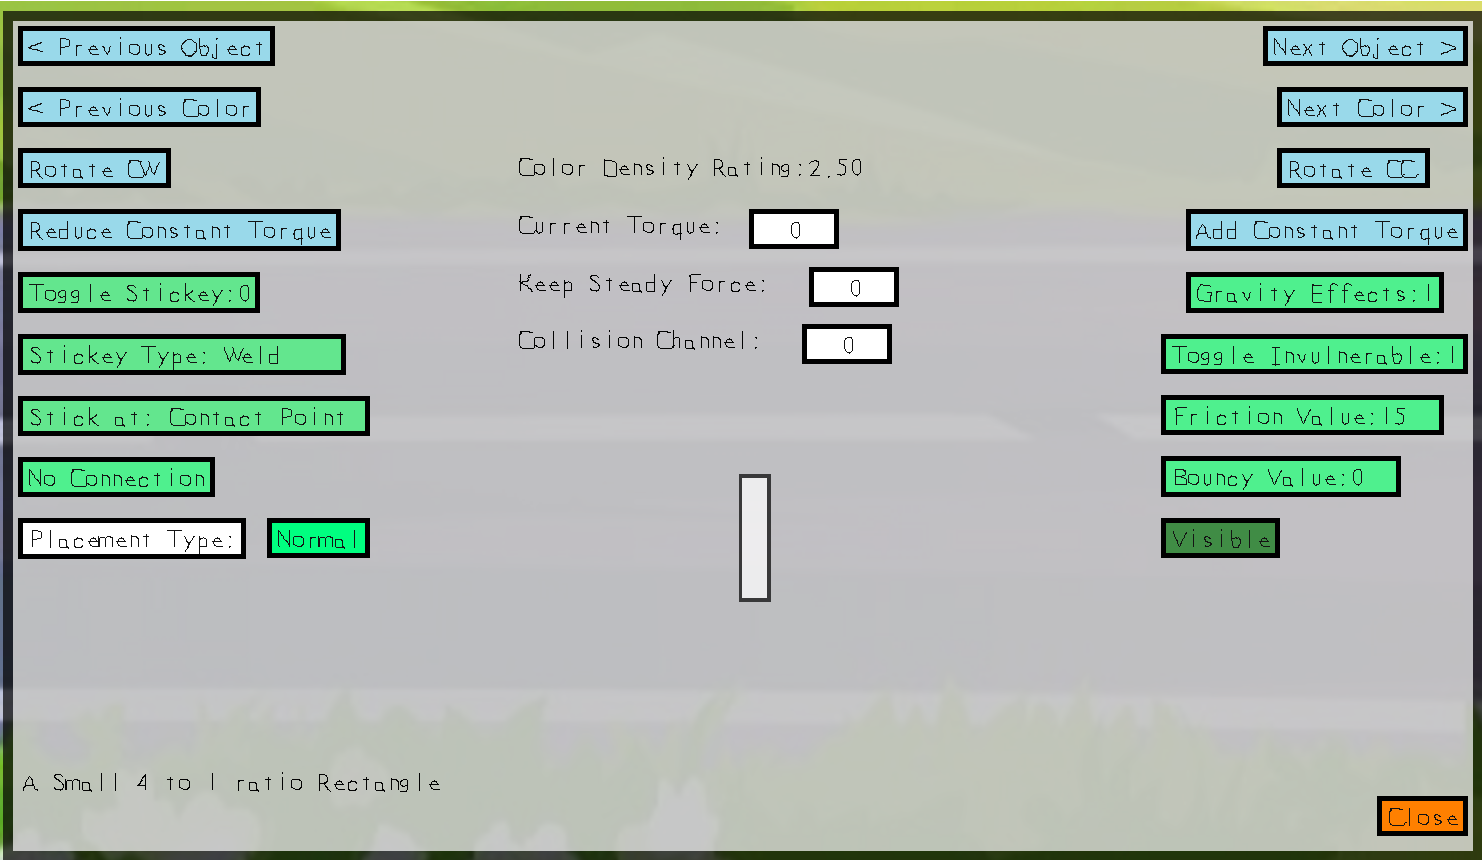
Each option / button will be explained in the below table
| Button Name | Explination |
| Previous Object & Next Object | Used to simply go back and forth through the list of selectable objects to spawn The Left & Right Arrow keys are shortcuts to do the same thing. |
| Previous Color & Next Color | Used to simply go back and forth through the list of selectable colors for each object The Page Up & Page Down keys are shortcuts to do the same thing. Different colors are set to be more/less dense and therefore weight more or less. So you can see the current selected colors density rating eg. "Color Density Rating: 2.50" |
| Rotate CW & Rotate CC | Used to simply Add or remove 5 degrees of rotation to the object The Up and Down arrow keys are shortcuts to do the same thing but they rotate by 15 degrees per press Look at the object preview on your cursor to see the degree of rotation on your object. |
| Reduce Constant Torque & Add Constant Torque |
Torque is the physics word meaning spinning force. So Constant torque basically means that this amount of spinning force will be constantly applied to this object every frame. The buttons are used to simply Add or remove 30 Neutons per second of force to the constant torque value You can also click on the white text input box to the right of "Current Torque:" and just type in the desired value Heavier objects will require more torque force than lighter objects to a similar amount of "spinning" |
| Keep Steady Force: | Keep Steady Force means that this amount of force will constantly be used to try and ensure this object remains at the angle/rotation it was at when it was spawned The further away the rotation is from the target angle the more % of this force value will be used, and the closer it is to the target angle the less % of this force value will be used You can click on the white text input box to the right of "Keep Steady Force:" and just type in the desired value Note that Heavier objects will require more force than lighter objects to have a similar effect |
| Collision Channel: | Collision Channels can be set to PREVENT collision between certain objects. By Default everything has a Collision Channel value of 0, which means it will collide with anything else. If a value other than 0 is defined such as 1, this means that it will NOT collide with other objects of the same collision channel 1 You can click on the white text input box to the right of "Collision Channel:" and just type in the desired value |
| Toggle Stickey: | Pressing the button toggles you through a value from 0 to 2. Having a non-zero sticky value means that the object will create a join "stick to" the next object it collides with. When an object with a sticky value greater than one collides with another, they stick and join. Then the sticky value is reduced by one. This means that an object with a sticky value of 1 will only stick to the first thing it touches and no longer be stickey after that. So if a stickey value of 2 is set to an object, it will stick to the next 2 objects it touches, before it is no longer "stickey". |
| Stickey Type: | Pressing the button toggles you through the 2 types which are "weld" and "rotate" Weld means that when the object sticks to the other object, the joint will be solide and does not rotate. Such as when you "weld" to metal bars together. Rotate means that when the object sticks to the other object, the joint will be able to rotate. Such as when you connect a wheel to an axel on a car. |
| Stick at: | Pressing the button toggles you through the 2 types which are "Contact point" and "Object Center" Contact Point is the default and means that the joint between the two objects will be made at exactly where they touch each other Object Center means the joint between the two objects will be made at the center of the sticky object and the contact point of the non sticky object |
| No Connection / Rope Connect / Bar Connect | Pressing the button toggles you through the 3 options No Connection / Rope Connect / Bar Connect While this button is set to rope connect, each subsiquently created object will be added with a rope joint connecting it to the previous object While this button is set to bar connect, each subsiquently created object will be added with a bar joint connecting it to the previous object Note: A bar joint will force 2 objects to stay at a spesified distance and they cannot go further or closer than the bar length A rope joint only prevents the 2 objects from going beyond the rope length |
| Placement Type: | These placement type options are like shortcuts to doing common things with the above sticky options and are not really meant to be used with any stickey settings Pressing the button to the right of it toggles you through the 4 types which are: "Normal" - This means object is just spawned as a normal dynamic object "In Place" - This means object is just spawned as a static object. It does not move / is not effected by outward forces but can still be collided with. Note: A "shortcut" to placing static objects is to simply use right click to spawn when in "Normal" placement mode. "Anchor in place (middle)" - The object will be spawned as a dynamic object but attached at the MIDDLE to a small static object with a rotation joint "Anchor in place (top)" - The object will be spawned as a dynamic object but attached at the TOP to a small static object with a rotation joint "Rope Anchor" - The object will be spawned as a dynamic object but attached to a small static object above with a rope joint. Remember to put this back to NORMAL mode when done using it! |
| Gravity Effects: | Pressing the button toggles you through the 2 types which are 0 and 1 1 means that gravity does effect this object while 0 means that gravity will not effect it |
| Toggle Invulnerable: | Pressing the button toggles you through the 2 types which are 0 and 1 1 means that the object will be invulnerable and cannot be broken or destroyed 0 means that the object will be vulnerable and can be broken or destroyed from collision with enough force Notes: Vulnerable objects have 255 HP, Objects can also have damage reduction values set in the Edit Menu. Also object density is a factor in damage calculation so this means more dense objects take less damage from collisions. |
| Friction Value: | Pressing the button toggles you through values 0 to 100 A value of 100 means that the object is rough and causes alot of friction. A value of 0 means that the object has no friction and therefore is very slippery |
| Bouncy Value: | Pressing the button toggles you through values 0 to 100 A value of 100 means is very bouncy, 100% of force is returned when its collided with A value of 0 means that the object has no bouncyness to it, or in other words, it will be very Hard |
| Visible & Invisible | Pressing the button toggles you from Visible to Invisible Invisible means that the object will not be rendered / shown on the screen when in any other user mode other than level editor visible means that the object will rendered / shown as usual |
Creating Levels - Events | Go back to Top |
This section will attempt to explain what events are and how they are used.
Simply put, we will have a few number of Events, and then a large number of different Actions that we can make happen when an Event ocures.
1 Event for example is a "On Collision", and 1 Action example is "Level Complete - WIN".
So we could easily create an event to trigger the completion of the level when say object 1 and object 2 collide.
Imagine object 1 is part of your character and object 2 is at the other end of the level. So creating such an event has made is a goal to get to the other end of the level and touch the goal object (object ID 2)
First here is a snapshot of the in game Event Menu, and with this picture in mind, we will go through and explain All the Events
With the Event Menu Open we need only click on the next type or prev type buttons to toggle through the different events
One Imporant reminder is than an objects ID can be found by switching to Hand Tool Mode and then right clicking on an object.
Menu Notes:
Press "Prev Type / Next Type" to toggle through the Event Trigger types.
Press "No Action" button with left or right clicks toggle back and forth through the Event Actions.
A Persistent event means it can be triggered multiple times, while once only means the event will disable itself after it is called once.
Cool Down & Delay Values are measured in frames, not seconds.
The Trigger test button can be pressed to perform the Event Action you have selected for conveinience/ testing etc

Event Triggers
| Event | Explination / Usage |
| On Collision | Lets say we want an action to happen when Object with ID of 2 collides with object with ID of 4 In this case we would want to set the source object ID to 2, and the Trigger object ID to 4 If we want Object with ID of 2 to trigger an action when colliding with any object. we would put Object ID 2 as the source object and -1 as the trigger object ID It's also worthy of mention that ID of 0 represents the walls,roof & floor of the level. So if we want an action to happen only when an object touches the walls or floor, we could put 0 in the Trigger object box to do this. |
| On Key press Down | For the Key press events, the only factor is what key/joypad button was pressed For example, we may want to add upward force to an object when the up arrow key is pressed. In this case, we would simplly click and highlight the Trigger input box and then press they key/button that they wish to be used to trigger the action. This will cause the spesified action to happen whenever that button/key is pressed down |
| On Key press Up | For the Key press up events, the only factor is what key/joypad button was pressed Simplly click and highlight the Trigger Obj ID input box and then press they key/button that they wish to be used to trigger the action. This will cause the spesified action to happen whenever that button/key is released (let go) |
| On Death | You want an action to ocure when Object #1 gets destroyed? choose On Death event type and enter "1" as the Source object Then the subsiquent action spesified will ocure when Object with ID of 1 is destroyed (or dies) |
| On Game Start | For On Game Start Event, we dont need any Source or Trigger object ID. You can simply add the desired action without worrying about any conditions for this event. |
| On Obj Create | Objects like canons create other objects No need to set a Trigger Object ID or a Source Object ID Set the Effect this object ID value to -1 to have the newly created object be the object that gets effected |
| On Obj Create | Objects like canons create other objects No need to set a Trigger Object ID or a Source Object ID Set the Effect this object ID value to -1 to have the newly created object be the object that gets effected |
| On Obj Wake | When an object starts moving when previously motionless The event will trigger the action if the Source Object ID object "wakes" |
| On Obj Sleep | When an Object stops moving when previously was moving The event will trigger the action if the Source Object ID object "sleeps" |
| On Hand Tool Grab | When the set source object is grabbed with the Hand Tool |
| On Hand Tool Release | When the set source object is released with the Hand Tool |
Event Actions
These are the list of Actions that can be called with the above events:
| Action | Explination / Usage |
| No Action | Nothing happens. |
| Self Destruct | The Effected object will be Destroyed / Deleted The object that will be deleted will have the ID spesified in the "Effect this Obj ID" input Action Values 1 and 2 are not needed / not used. |
| Add Torque | The Effected object will have Torque Force added to it Only the object defined in the "Effect this Obj ID" input will be effected Action Values 1 is used as the amount of Torque force in Neutons to add to the object |
| Add Force | The Effected object will have Force added to it Only the object defined in the "Effect this Obj ID" input will be effected Action Values 1 and 2 are used as the amount of force in Neutons to add to the object |
| Constant Torque | The Effected object will have its Constant Torque value set Only the object defined in the "Effect this Obj ID" input will be effected set the desired new value for Contant Torque in the "Action Values 1" input |
| Remove Joints | The Effected object will have it joints removed Only the object defined in the "Effect this Obj ID" input will be effected If "Action Values 1" left at 0 then all joints will be removed. Otherwise the number entered in action value 1 will be the number of joints that will be removed. |
| Toggle Ability | The Effected object will have it ability turned off or on Only the object defined in the "Effect this Obj ID" input will be effected If "Action Values 1" set to 0 then Ability will be turned off. If "Action Values 1" set to 1 then Ability will be turned on. |
| Set Rope Length | The Effected object will have its RopeJoint Length set Only the object defined in the "Effect this Obj ID" input will be effected If "Action Values 1" is were to set the new desired rope length If "Action Values 1" set to 1 then Ability will be turned on. |
| Set Selected Obj | The selected object will be set to the object ID set in Action Values 1 Note: Screen will scroll to the selected object when in user mode 2 or 3 (level editor / hand tool mode) |
| Set Obj Position | The Effected object will have its position changed/set Only the object defined in the "Effect this Obj ID" input will be effected |
| Set Obj Angle | The Effected object will have its rotation/angle be changed/set Only the object defined in the "Effect this Obj ID" input will be effected |
| Rotate Static Obj Angle | The Effected STATIC object will have its rotation/angle be changed by the amount spesified in "Action value 1" Only the object defined in the "Effect this Obj ID" input will be effected This action is only meant to be used on static/in place objects |
| Rotate Obj Angle | The Effected object will have its rotation/angle be changed by the amount spesified (in degrees) in "Action value 1" Only the object defined in the "Effect this Obj ID" input will be effected |
| Set Obj HP | The Effected object will have its HP set to the value given in "Action Value 1" input This will only really have any effect on objects set not set as invulnerable |
| Max All Obj HP | All objects will have its HP set to max 255 Action Values 1 and 2 are not needed not used |
| Level Complete - WIN | The value given in "Action Value 1" will be added to the Win variable Once the Win Variable reaches 1.00 the level will be complete via WIN and exit to level menu Setting an "Effect this obj ID" value is ingored and not neccesary |
| Level Complete - LOSS | The value given in "Action Value 1" will be added to the Loss variable Once the Loss Variable reaches 1.00 the level will be considered failure and exit to level menu Setting an "Effect this obj ID" value is ingored and not neccesary |
| Rope Connect Objs | Enter Object IDs in Action Value 1 and 2 The 2 objects will have a Rope joint connect them together The Rope length will be set to the distance between the 2 objects |
| Bar Connect Objs | Enter Object IDs in Action Value 1 and 2 The 2 objects will have a Bar joint connect them together The Bar length will be set to the distance between the 2 objects |
| Set Obj Stickey | Enter the desired sticky value into "Action Value 1" The object spesified in the Effect This Obj ID will have its stickey value set |
| Set Control Obj | Enter the desired Object ID value into "Action Value 1" The object spesified will be the object the screen scrolls with when in User Mode 1(rocket mode) |
| Rotate Joint Angle | Enter the desired change in rotation in degrees in "Action Value 1" All weld joints on the object in "Effect This Obj ID" will be rotated by that amount in degrees |
| Display Message # | You can have messages in your level in files such as message1.txt message2.txt Entering an action value of 1 means that message1.txt will be open and displayed to the user and the game will be paused The Effect this Obj ID input is not needed and ignored |
| Set Ticks | Enter the desired number in "Action Value 1" Cool down of events is calculated by object ticks Therefore you can reset cooldowns on events by setting the ticks of an object to a value higher than the cool down |
| Constant Force | Enter the desired x axis amount of force "Action Value 1" and y axis amount of force on "Action value 2" This amount of force will be added to the object every frame/game loop |
| Activate Ability | Special objects such as canons have abilities The effected object will perform its ability once when this is called, such as a canon firing once. Use the effect this object ID to spesifiy which object will be effected by this action and activate its ability |
| Create Explosion | An explosion will be created at the location of the Effect this object IDs location It creates a visual explosion as well as a forcefull explosion |
| Play Sound(x).wav | You can have sound effects in your level in files such as sound1.wav sound2.wav Entering an action value of 1 means that sound1.wav will be open and played The Effect this Obj ID input is not needed and ignored |
| Set Event Disabled | Used to set another event to disabled
put the event type ID in Action Value 1 put the event ID in Action Value 2 The Effect this Obj ID input is not needed and ignored |
| Set Event Enabled | Used to set another event to Enabled
put the event type ID in Action Value 1 put the event ID in Action Value 2 The Effect this Obj ID input is not needed and ignored |
| Set Obj Life | Note: Life not to be confused with HP Life is the number of frames/game loops that the object has to live before it disapears, usually set to -1 which means it does not ever expire Enter the desired value for life in "Action Value 1" Only the object defined in the "Effect this Obj ID" input will be effected |
| Add Keep Steady Angle | Effected object will have its Keep Steady Angle changed by the amount in radians entered in "Action Value 1" Enter the desired change value in "Action Value 1" Only the object defined in the "Effect this Obj ID" input will be effected |
| Set Keep Steady Angle | Effected object will have its Keep Steady Angle set to the amount in radians entered in "Action Value 1" Enter the desired set value in "Action Value 1" Only the object defined in the "Effect this Obj ID" input will be effected |
| Add Keep Steady Force | Effected object will have its Keep Steady Force changed by the amount in Neutons/sec entered in "Action Value 1" Enter the desired change value in "Action Value 1" Only the object defined in the "Effect this Obj ID" input will be effected |
| Set Keep Steady Force | Effected object will have its Keep Steady Force set to the amount in Neutons/sec entered in "Action Value 1" Enter the desired set value in "Action Value 1" Only the object defined in the "Effect this Obj ID" input will be effected |
| Set Extra screen Scroll Obj | If using Secondary view screen, use this to set which object that screen scrolls with Enter the desired set Object ID value in "Action Value 1" The Effect this Obj ID input is not needed and ignored |
| Set Game Speed | Changes the speed of the physics engine processing Enter the desired set Object ID value in "Action Value 1" 0 = Very Fast 1 = Fast 2 = Normal 3 = Slow 4 = Very Slow |
| Set Obj Static | Effected object will have its static status set to 0 or 1 (true or false) Enter the desired set Object ID value in "Action Value 1" The Effect this Obj ID input is the object that will be effected |
| Multiply Constant Torque | Effected object will have its current constant torque value multiplied by action value 1 example set to negative -1 to simply change the torquing direction set to 2 to double the torque force set to 0.5 to half the torque force |
| Set Apply Impulse | Effected object will have some constant linar impulse, force to move it forward in its facing direction. set to 0 to turn off set action value 1 with the amount of force desired. double values like 0.5 are supported |
| Formation Actions | Formations are a new feature to allow you to use small pictures/bitmaps to either load or keep objections in a perfect formation. This is inteded to be low resolution images because each pixel will become an object, and the engine can obviously handle so many objects. Try to keep the pixel count to no more than 6000. The loaded formation objects will copy the attributes from the spesified parent object. max amount of formations that can be loaded at a time is 5. formations should be in a sub folder in your level folder called "formations" and be named "1.bmp" , "2.bmp" etc. All the formation actions will be explained below. |
| Load a Formation bmp# | action value 1 spesifies which formation bmp file to load ( 1 to 5 ). Effect This Obj ID spesifies the parent object. the parent object will always become the bottom right most pixel in the bmp. attributes such as damage reduction, static, object type are all copied from the parent object. |
| Change loaded Formation | action value 2 spesifies which formation bmp file to load ( 1 to 5 ). action value 2 spesifies which of your possible formations from 1 to 5 should change to take on this new formation if the new formation has more pixels than the former, new objects will be created. if the new fomration has less pixels than the former, the extra objects will just be ignored by the formation. |
| Set Formation Padding | action value 1 spesifies which formation bmp file to load ( 1 to 5 ). action value 2 spesifies the amount of padding you want to SET between each object in formation, like to maker bigger or smaller. |
| Add Formation Padding | action value 1 spesifies which formation bmp file to load ( 1 to 5 ). action value 2 spesifies the amount of padding you want to ADD between each object in formation, like to maker bigger or smaller. |
| Pause/Unpause Formation | action value 1 spesifies which formation bmp file to load ( 1 to 5 ). action value 2 spesifies if you want to pause or unpause. 1 to pause and 0 to unpause. paused formation will no longer generate force to try to keep the objects in formation around the parent obj if your formation is static( stuck in place ) then this really has no effect |
Go back to Top
some footer info